Install Your Mira L2/L5 Power Windows with Confidence
So you’ve bought a full set of Mira L2/L5 power windows, and now you’re ready to get your hands dirty. Sure, some people might say, “Just pay a pro to do it.” But trust me—when you finish the job yourself, that sense of achievement is worth every minute.
Installing power windows might sound tricky, but it’s completely doable. With a little care and the right reference, you can get the job done like a champ.
Let’s walk through what you need to know.
Understanding Mira L2/L5 Power Windows Wiring
The most confusing part for many DIYers is the wiring. If you’re staring at a bunch of wires with no clue what they do, don’t worry. Here’s a breakdown of the color codes and their functions, which are common across most Mira L2 and L5 models.
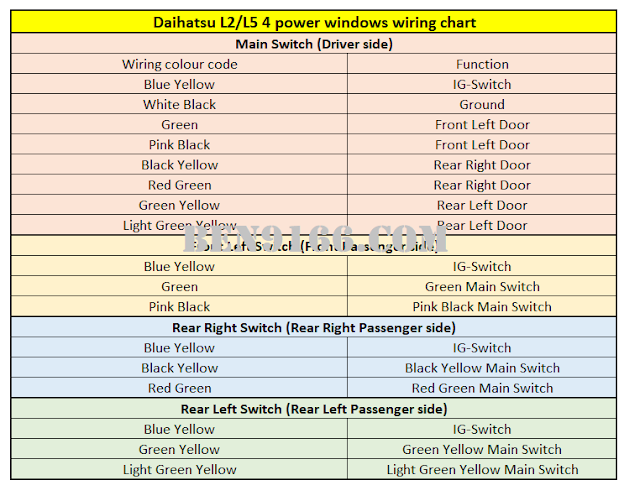
Basic Wiring Functions:
- Red: Power (12V+)
- Black: Ground
- Blue: Switch control (up)
- Green: Switch control (down)
- Yellow: Motor positive
- White: Motor negative
Different sets may vary slightly, so always test with a multimeter before making permanent connections.
Steps to Install Mira L2/L5 Power Windows
- Remove the Manual Winder Mechanism
First, remove your door panel and the manual window winder. Keep all screws safe—you’ll reuse them later. - Mount the Power Window Regulator
Align the new power regulator with the factory holes. Most aftermarket kits are plug-and-play, but minor drilling may be needed. - Connect the Motor Wires
Use the color chart above to identify the motor wires. Connect them according to the kit’s manual or test the direction with a 12V battery before finalizing. - Install Switches
Mount your switches on the door panel or dashboard. Choose a location that is easy to reach and won’t obstruct other controls. - Wire the Power Source
Run the red power wire to an ignition source or fuse box. Connect the ground wire securely to the vehicle chassis. - Test Everything
Before sealing the door panel back up, test both windows thoroughly. If they move the wrong way, simply swap the motor wires.
Final Thoughts
Doing the installation yourself saves money and gives you full control over how it’s done. Plus, you’ll learn more about your Mira than ever before.
If you’re careful, patient, and follow the wiring chart, you’ll have smooth-operating Mira L2/L5 power windows in no time.
Ready to upgrade? Roll up your sleeves and make it happen!