
Introduction
Ever wondered why everyone’s obsessed with Mechanical Keyboards lately? Whether it’s the satisfying click, the premium build feel, or the endless customization, these keyboards have become more than just typing tools they’re personal statements.
If you’ve always wanted to build your own mechanical keyboard but don’t know where to start, this guide breaks it all down for you, step by step, with zero overwhelm.
Why Choose Mechanical Keyboards?
Unlike regular membrane keyboards, Mechanical Keyboards use individual switches under each key. This means better feedback, longer lifespan, and full customization potential.
They’re loved by gamers for speed and precision, by programmers for reliability, and by typists for comfort. Plus, you can make them sound and feel exactly how you want from deep thocks to sharp clicks.
Fun fact: Some enthusiasts spend hours tuning their switches just to achieve the perfect typing “feel.”
What You’ll Need to Build Your Mechanical Keyboard
Building Mechanical Keyboards might seem intimidating, but with the right parts, it’s surprisingly simple.
1. Keyboard Case
The case determines size, aesthetics, and sound profile.
- Materials: Plastic (light), aluminum (premium feel), or acrylic (aesthetic).
- Tip: Start with a 60% or TKL layout for easier assembly.
2. PCB (Printed Circuit Board)
The PCB is your keyboard’s brain, it registers keystrokes.
- Choose hot-swappable PCBs if you want to test different switches without soldering.
- Fixed PCBs require soldering but offer stronger stability.
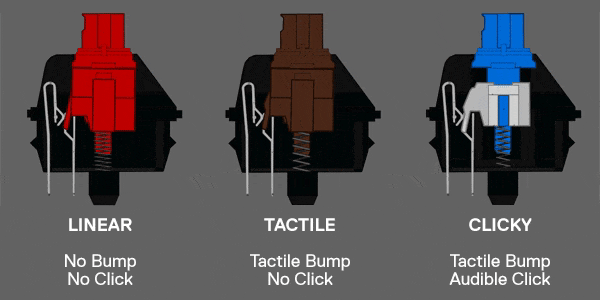
3. Switches
The heart of Mechanical Keyboards. Each switch has its own feel and sound, like Cherry MX Red, Brown, or Blue switches — pick the one that suits your typing style:
- Linear: Smooth and quiet (e.g., Cherry MX Red).
- Tactile: Noticeable bump, great for typing (e.g., Brown).
- Clicky: Audible click, classic mechanical sound (e.g., Blue).
4. Keycaps
Choose colors that reflect your style, minimalist, retro, or themed, using durable PBT keycaps for a premium feel.
- ABS: Shiny, smooth, cheaper.
- PBT: Matte, durable, premium texture.
- Choose colors that reflect your style, minimalist, retro, or themed.
5. Stabilizers
These keep larger keys like Spacebar and Enter from wobbling.
- Lubing stabilizers reduces rattle and improves sound dramatically.
6. Tools You’ll Need
- Keycap puller
- Switch puller
- Screwdriver
- Lube kit
- Tweezers
- Optional: soldering iron (for soldered PCBs)
Step-by-Step: How to Build Your Mechanical Keyboard
Step 1 – Prepare Your Workspace
Find a clean, static-free surface. Lay out all your components.
Step 2 – Install Stabilizers
Insert and secure stabilizers on the PCB. Test for rattle and lube if needed.
Step 3 – Mount the Switches
If using a hot-swap PCB, press the switches into the sockets.
For soldered boards, heat the pins and apply a small amount of solder per switch.
Step 4 – Assemble the Case
Once all switches are in, screw or snap the PCB plate into the case.
Step 5 – Add Keycaps
Press your keycaps firmly on top of each switch stem.
Step 6 – Plug and Test
Connect your keyboard to your PC or laptop. Use tools like VIA or QMK Configurator to test and customize key mappings.
Tuning and Customization Tips
The magic of Mechanical Keyboards lies in personalization. Once built, you can fine-tune it further:
- Lube switches for smoother feel.
- Add foam dampening to improve acoustics.
- Change keycap profiles (e.g., SA, DSA, Cherry) to adjust typing height and comfort.
- Use software like VIA or QMK for custom macros, lighting, and layers.
DIY
Mechanical Keyboard Tuning Guide
How Much Does a Custom Mechanical Keyboard Cost?
Expect to spend around:
- RM300–RM400 for budget builds
- RM800+ for mid-tier aluminum kits
- RM1,200+ for premium setups
But here’s the truth: once you build one, it’s hard to stop. Many enthusiasts end up building two… or five.
Common Mistakes to Avoid
- Forgetting to test the PCB before assembly
- Over-lubing switches (can ruin feel)
- Mixing incompatible parts (plate doesn’t fit PCB, etc.)
- Ignoring ergonomics, comfort matters!
Conclusion: Why Building Mechanical Keyboards Is Worth It
Building your own Mechanical Keyboards isn’t just about having a better typing tool, it’s about crafting something uniquely yours. The process teaches patience, precision, and creativity.
Even if it’s your first build, you’ll quickly see why enthusiasts call it addictive craftsmanship. The end result isn’t just a keyboard, it’s a reflection of you.
So go ahead start your build, and feel that first satisfying keystroke.


Be sure to check for any installation instructions to avoid complications.
minecraft 1.21 101 download https://download-minecraft-apk.com/minecraft-pe-1-21-121-apk/